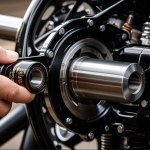

Essential Tools and Materials for Effective Heat Shield Installation
To ensure a successful heat shield installation, having the right tools and materials is essential. Start with basic hand tools like screwdrivers, wrenches, and pliers to remove old components and secure new shields. A drill with metal bits helps create precise holes for mounting brackets or screws. Additionally, a torque wrench guarantees fasteners meet manufacturer specifications, maintaining secure attachment.
Regarding materials, heat shields come in various forms, including aluminum sheets, multi-layered composites, and reflective foils. Select a heat shield suitable for your vehicle make and model; compatibility affects durability and cooling effectiveness. High-quality vehicle cooling solutions may include heat-resistant adhesives or special mounting clips, which enhance stability and performance.
In parallel : Ultimate Guide to Tire Pressure Monitoring Calibration: Key Insights for Safe Driving on UK Roads
Quality matters. Opt for materials that provide excellent heat resistance, corrosion protection, and durability under engine bay conditions. Check product specifications for maximum temperature tolerance. When sourcing, choose reputable automotive suppliers or specialist shops offering warranties and technical support to ensure reliability.
By equipping yourself with the appropriate heat shield installation tools and quality materials, you lay a solid foundation for protecting your vehicle from excessive heat and enhancing overall cooling efficiency.
Also read : Ultimate Guide to Vehicle Stability: Custom Control Settings for All Driving Conditions
Step-by-Step Guide to Installing Heat Shields in Your Vehicle
Installing a heat shield correctly is vital to vehicle cooling solutions and lasting protection. Begin the heat shield installation process by thoroughly cleaning the engine bay area where the shield will be mounted. Remove dirt, grease, and any old adhesive residue to ensure strong adhesion and secure attachment.
Next, accurately measure and mark the placement spots for the heat shield using templates or the shield itself. Correct placement is crucial; positioning too close to hot components may cause premature wear, while too far reduces effectiveness. Use manufacturer guidelines for the best location.
When attaching, employ appropriate heat shield installation tools such as drills for mounting holes and torque wrenches to tighten fasteners to recommended specifications. Avoid over-tightening, which can distort or crack heat-resistant materials.
Common mistakes include using incompatible materials, neglecting surface prep, or skipping torque specifications. These errors compromise the shield’s ability to manage heat effectively, risking engine damage or reduced component longevity.
For a DIY vehicle heat protection project, patience and precision during each installation step will ensure optimal cooling results and extend the shield’s lifespan. By following these proven techniques, you maintain your vehicle’s performance through enhanced heat management.
Safety Guidelines and Precautions During Installation
Installing heat shields demands strict adherence to vehicle safety tips to prevent injury and ensure lasting effectiveness. Before beginning, disconnect the vehicle battery to avoid accidental electrical shorts. Always work in a well-ventilated area free of flammable materials, as the engine bay may contain grease residues and fumes.
Handling heat-resistant materials requires caution—they can have sharp edges or may become brittle. Wear protective gloves and safety glasses to guard against cuts and debris. Using proper heat shield installation tools such as insulated screwdrivers prevents burns or shocks when working near hot engine parts.
During the installation process, remain mindful of engine components and wiring harnesses. Avoid compressing sensitive parts or routing mounting fasteners where they may cause chafing. Following precise torque settings when fastening ensures secure attachment without damaging the shield or vehicle.
Finally, after completing the installation, allow the engine bay to cool completely before testing or driving. These installation safety measures protect both you and your vehicle, promoting a smooth, trouble-free vehicle cooling solution upgrade while minimizing risks associated with heat shield installation.
Troubleshooting Installation Issues and Ensuring Effectiveness
When evaluating installation effectiveness, watch for signs like rattling noises, loosened fasteners, or excessive heat near components shielded by your heat shield installation. These often indicate improper attachment or shield misplacement. Troubleshooting heat shield problems starts with a close inspection: check if mounting brackets are secure and if the shield sits correctly, allowing airflow but not contacting hot parts.
If the shield vibrates, tighten fasteners using the recommended torque values from your tool specs to prevent damage. Warping or cracking can arise from over-tightening or poor-quality materials; replace damaged shields promptly to maintain optimal vehicle cooling solutions. Also, confirm that all adhesive or mounting clips remain intact; their failure reduces stability and heat resistance.
Testing after installation involves running the engine and monitoring temperature changes around critical components. A properly installed heat shield lowers surface temperatures and improves overall heat management. If heat accumulation persists, reassess shielding coverage and consider adding reflective layers or upgrading to higher-grade heat shield installation materials.
By addressing issues early, you ensure longevity and effective protection, safeguarding your vehicle’s performance under thermal stress.
Ongoing Maintenance and Longevity of Your Vehicle’s Heat Shields
Regular heat shield maintenance is crucial to ensure long-term effectiveness in your vehicle cooling solutions. Conduct inspections every few months or after intense driving conditions. Look for signs like corrosion, loosened fasteners, or cracks in the heat-resistant materials that could compromise protection.
Cleaning your heat shield carefully helps maintain optimal performance. Use mild solvents or specialized cleaners designed for automotive parts, avoiding abrasive tools that might damage the protective reflective surfaces. Keep mounting points and brackets free from debris to prevent rattling or loosening over time.
When should you consider repair or replacement? If you notice persistent heat buildup near vital components, visible warping, or repeated detachment despite proper fastening, it’s time to act. Repair minor cracks with heat-resistant adhesives, but replace shields with structural damage or compromised materials promptly. Doing so preserves the shield’s ability to shield your engine bay effectively.
Consistent vehicle cooling maintenance paired with attentive inspection habits safeguards your investment. Proper upkeep enhances heat shield function, prolongs the lifespan of engine components, and supports efficient heat management—key for reliable vehicle performance under thermal stress.
Expert Tips and Answers to Frequently Asked Questions
Delving into heat shield expert advice enhances your understanding of the installation nuances. Experts emphasize the importance of precision during the heat shield installation process. Ensuring exact placement avoids contact with hot engine parts while maximizing heat deflection, crucial for effective vehicle cooling solutions.
Common questions often involve choosing the right materials. Professionals recommend selecting heat shield materials matched to the vehicle’s operating temperature and exposure. Multi-layered composites or reflective aluminum foils frequently offer superior performance for high-heat zones. Pairing with proper heat shield installation tools like torque wrenches ensures secure and damage-free attachment.
Another expert tip involves gradual engine testing post-installation to verify shield stability and temperature reduction. This approach helps catch subtle issues before they lead to wear or component damage.
For beginners wondering about DIY feasibility, experts encourage a methodical approach: thorough cleaning, careful measurement, and cautious tool use. Avoiding shortcuts in these steps prevents common errors like loose fittings or uneven heat protection.
Addressing these FAQs solidifies confidence for both novice and experienced installers, making your heat shield installation a more reliable and effective upgrade for enhanced vehicle cooling solutions.