Step-by-Step Guide to Upgrading Front Brake Discs on the Kawasaki Z1000
Master the process one step at a time for a precise upgrade.
Starting your DIY brake disc upgrade on the Kawasaki Z1000 requires careful planning. First, prepare a clean, well-lit workspace. Lay down protective mats to catch any dropped bolts or parts. Essential safety gear includes gloves, eye protection, and a sturdy motorcycle stand to keep the bike stable throughout the process.
In parallel : The Definitive Guide to Safely Lubricating Steering Bearings on Your Triumph Thruxton R: Pro Tips and Best Practices
The overall brake disc upgrade process for the Z1000 involves several key stages: safely lifting the bike, removing the front wheel, detaching the calipers and old brake discs, inspecting related components, installing new discs, and then reassembling everything precisely.
Recommended tools are crucial for a smooth Kawasaki Z1000 brake installation. You’ll need a torque wrench calibrated to the specific brake disc bolt torque specifications, Allen keys, a ratchet with sockets, and possibly a breaker bar for tightly torqued bolts. Also have brake cleaner and non-contaminating cloths on hand to clean discs before installation.
Following this step-by-step motorcycle maintenance structure will streamline the process, enhance safety, and ensure long-lasting brake performance that matches or exceeds factory standards.
Step-by-Step Guide to Upgrading Front Brake Discs on the Kawasaki Z1000
Your clear path to a safer, more effective brake upgrade.
Before beginning your DIY brake disc upgrade, ensure the workspace is organized for efficiency. This organization is essential for a streamlined Kawasaki Z1000 brake installation, reducing missteps and lost parts. Use a motorcycle stand to secure the bike and prevent accidental movement during crucial steps. Wearing gloves and eye protection safeguards you from sharp edges and brake dust.
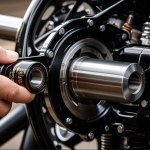
Start by carefully lifting the front of the motorcycle using the stand. Removing the front wheel follows, which entails loosening axle bolts while holding the wheel steady. Pay close attention to how the calipers attach; unfasten their bolts in a controlled manner to avoid damage. This step is vital in any step-by-step motorcycle maintenance routine focused on brake disc upgrades.
Next, detach the old brake discs by removing their mounting bolts. Inspect the hub, calipers, and brake pads for wear or damage before proceeding. Thorough inspection ensures that any hidden issues that could compromise new disc performance are addressed. Keeping these details in mind leads to a smooth Kawasaki Z1000 brake installation and better brake longevity.
Step-by-Step Guide to Upgrading Front Brake Discs on the Kawasaki Z1000
Preparation, workspace setup, and essential safety gear
Begin your DIY brake disc upgrade on the Kawasaki Z1000 by securing a clear, well-organized workspace with sufficient lighting. The right setup helps prevent lost parts and accidents during the process. Ensure the motorcycle is stabilized on a reliable stand rated for your bike’s weight to avoid tipping.
For safety, equip yourself with gloves and eye protection. Handling brake components and solvents like brake cleaner can irritate skin and eyes, so these precautions are vital. Keep non-contaminating cloths ready to clean the new discs before installation, avoiding any grease or dirt that could reduce braking efficiency.
The step-by-step motorcycle maintenance sequence relies on having the proper tools close at hand. Essential implements include a calibrated torque wrench, Allen keys, ratchets, and sockets designed for your Kawasaki Z1000 brake installation. Using the correct tools minimizes risks of damaging bolts or components, ensuring the brake disc upgrade proceeds smoothly.
This preparation stage lays the groundwork for a precise, safe installation. Skipping it can lead to mistakes or wasted time. Prioritize workspace order and safety gear before advancing to the front brake disc removal and replacement steps.
Step-by-Step Guide to Upgrading Front Brake Discs on the Kawasaki Z1000
Setting the stage for a precise and safe brake upgrade.
A successful DIY brake disc upgrade hinges on thorough workspace setup and the right safety gear. Start by ensuring your area is clean, well-lit, and equipped with non-slip mats. Using gloves protects hands from sharp edges and brake dust, while eye protection safeguards against any debris during disassembly or cleaning. Securing the Kawasaki Z1000 with a sturdy motorcycle stand is essential to keep the bike stable, preventing accidents and making step-by-step motorcycle maintenance smoother.
The Kawasaki Z1000 brake installation requires specific tools to handle the brake disc bolts and associated components correctly. Essential items include Allen keys, a torque wrench calibrated to the recommended brake disc bolt torque, ratchets, and sockets. Having brake cleaner and microfiber cloths ensures the new discs are spotless before fitting, which is critical for optimal brake performance. This attention to detail minimizes contamination risks and helps avoid braking issues after installation.
Approaching the upgrade systematically—starting with lifting the bike, then wheel and caliper removal—guarantees a solid foundation for replacing the discs. This careful preparation forms the backbone of step-by-step motorcycle maintenance, making each subsequent task more manageable and safe.